Difference between revisions of "Object Editing System"
(The LinkTitles extension automatically added links to existing pages (<a rel="nofollow" class="external free" href="https://github.com/bovender/LinkTitles">https://github.com/bovender/LinkTitles</a>).) |
m |
||
| Line 1: | Line 1: | ||
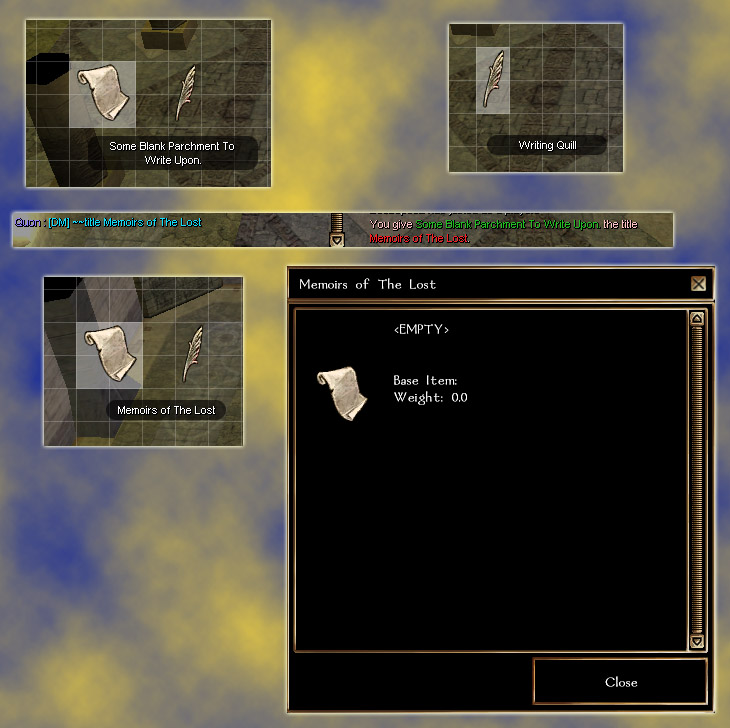
| − | + | ===Titling Your Parchment=== | |
| + | [[File:Scribe1.jpg]] | ||
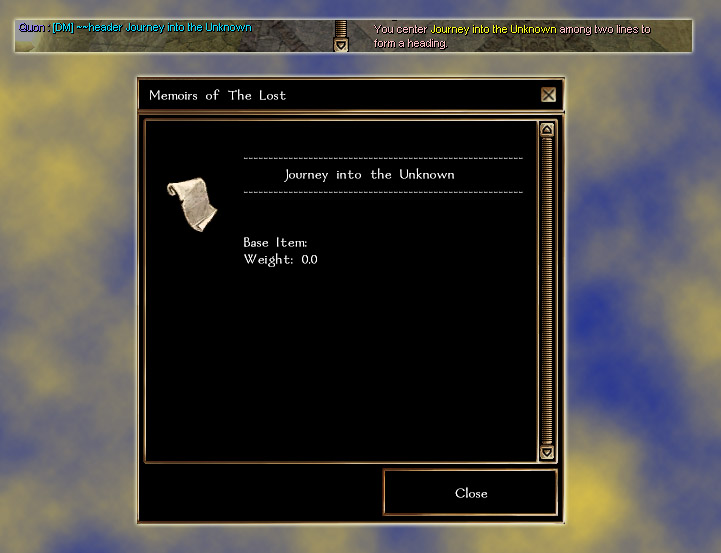
| + | ===Adding a Header=== | ||
| + | [[File:Scribe2.jpg]] | ||
| + | ===New Line and Some Text=== | ||
| + | [[File:Scribe3.jpg]] | ||
| + | Quick Command For Date and Location=== | ||
| + | [[File:Scribe4.jpg]] | ||
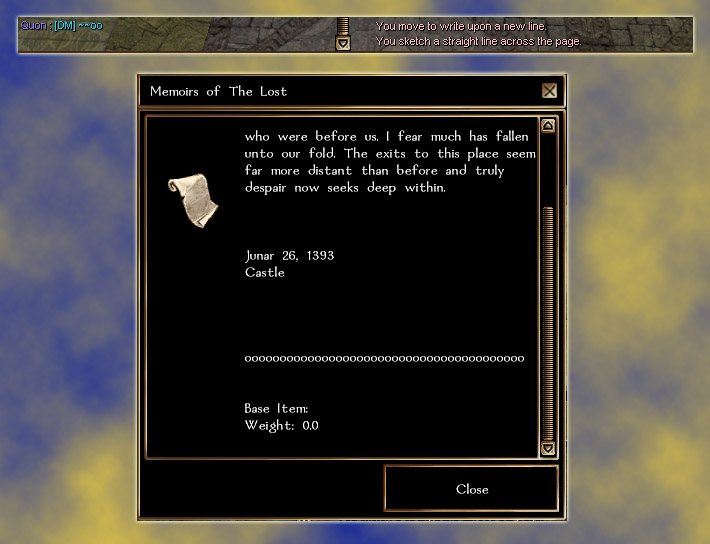
| + | ===Horizontal Rule of The Letter "o"=== | ||
| + | [[File:Scribe5.jpg]] | ||
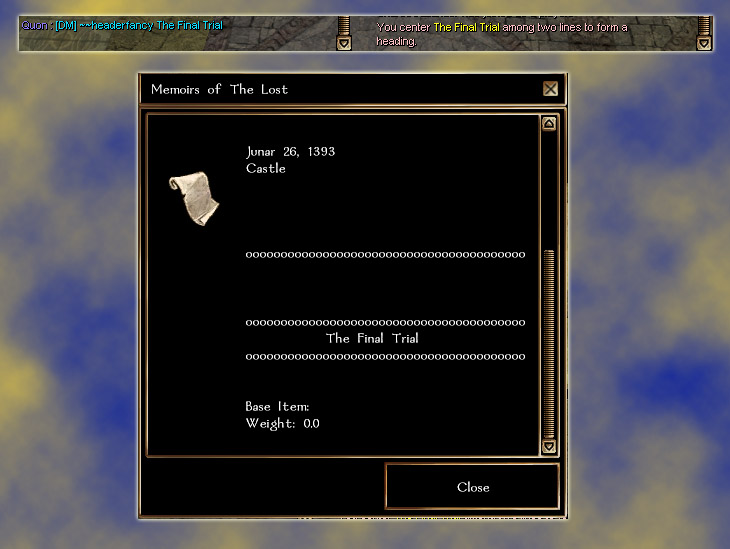
| + | ===Another Header=== | ||
| + | [[File:Scribe6.jpg]] | ||
| + | ===Undo and Delete=== | ||
| + | [[File:Scribe7.jpg]] | ||
| + | ===Your Name and Date=== | ||
| + | [[File:Scribe8.jpg]] | ||
| − | + | The commands I've listed below are also on the Quill's description in game. | |
| − | |||
| − | |||
| − | |||
| − | |||
| − | |||
| − | |||
| − | |||
| − | |||
| − | |||
| − | |||
| − | |||
| − | |||
| − | |||
| − | |||
| − | |||
| − | |||
| − | |||
| − | |||
| − | |||
| − | |||
| − | |||
| − | |||
| − | |||
| − | |||
| − | |||
| − | |||
| − | |||
| − | |||
| − | |||
| − | |||
| − | |||
| − | |||
| − | The commands I've listed below are also on the Quill's description in game. | ||
Notes: | Notes: | ||
| − | * Use the quill upon the object you will be | + | * Use the quill upon the object you will be editing. Syntax for the commands follow. |
| − | * Placing | + | * Placing edited items on your ox pack will wipe your changes. |
* You only need to use the quill once, it works the same as the language ears, requiring a voice. | * You only need to use the quill once, it works the same as the language ears, requiring a voice. | ||
* You can use the ~ on any channel. | * You can use the ~ on any channel. | ||
| Line 44: | Line 26: | ||
* Please read the Notes for various commands. | * Please read the Notes for various commands. | ||
| − | + | ===Commands=== | |
| − | + | Command: <code>~~title</code> | |
| − | + | Description: Changes the object's name. | |
| − | + | Usage: ~~title Plenarius' Diary | |
| − | |||
| − | |||
| − | Description: Changes the object's name. | ||
| − | Usage: ~~title Plenarius' Diary | ||
| − | |||
| − | |||
| − | |||
| − | |||
| − | |||
| − | |||
| − | |||
| − | |||
| − | |||
| − | |||
| − | |||
| − | |||
| − | |||
| − | |||
| − | |||
| − | |||
| − | |||
| − | |||
| − | |||
| − | |||
| − | |||
| − | |||
| − | |||
| − | |||
| − | |||
| − | |||
| − | |||
| − | |||
| − | |||
| − | |||
| − | |||
| − | |||
| − | |||
| − | |||
| − | |||
| − | |||
| − | |||
| − | |||
| − | |||
| − | |||
| − | |||
| − | |||
| − | |||
| − | |||
| − | |||
| − | |||
| − | |||
| − | |||
| − | |||
| − | |||
| − | |||
| − | |||
| − | |||
| − | |||
| − | |||
| − | |||
| − | |||
| − | |||
| − | |||
| − | |||
| − | |||
| + | Command: <code>~</code> | ||
| + | Description: Write upon the object's description. | ||
| + | Usage: ~So I was walking down the street the other day when a dragon fell from the sky. | ||
| + | Note: If you want a space before your word, then put one between the ~ and the first letter (i.e. ~ A new sentence) | ||
| − | + | Command: <code>~!</code> | |
| + | Description: Begins a new paragraph with the text following. | ||
| + | Usage: ~!The next morning dawned and things seemed a little better. | ||
| + | Note: Essentially inserts two new lines and five spaces before your text. | ||
| + | Command: <code>~~nl</code> | ||
| + | Description: Creates a new line. | ||
| + | Usage: ~~nl or ~~nll or ~~nlll or ~~nllll or ~~nlllll | ||
| + | Note: The amount of the letter "l" indicates how many new lines to insert, from one to five. | ||
| − | < | + | Command: <code>~~tab</code> |
| − | + | Description: Inserts some spaces. | |
| − | + | Usage: ~~tab | |
| − | Description: | ||
| − | Usage: ~~ | ||
| − | + | Command: <code>~~deleteNNN</code> | |
| − | < | + | Description: Deletes the last NNN characters. |
| − | + | Usage: ~~delete63 | |
| − | + | Note: If the amount of characters you try to delete exceeds the size of the text, you will erase it all. | |
| − | |||
| − | |||
| − | |||
| − | |||
| − | |||
| − | |||
| − | Description: | ||
| − | Usage: ~~ | ||
| − | Note: | ||
| − | + | Command: <code>~~erase</code> | |
| − | + | Description: Wipes the object's description completely. | |
| − | + | Usage: ~~erase | |
| − | |||
| − | |||
| − | |||
| − | |||
| − | |||
| − | |||
| − | |||
| − | |||
| − | |||
| − | |||
| − | |||
| − | |||
| − | |||
| − | |||
| − | |||
| − | |||
| − | |||
| − | |||
| − | |||
| − | |||
| − | Description: | ||
| − | Usage: ~~ | ||
| − | + | Command: <code>~~undo</code> | |
| − | < | + | Description: Restores your text to the previous state before your last command. |
| − | + | Usage: ~~undo | |
| − | + | Note: This only works once! There is no history, you can not keep undoing. | |
| − | |||
| − | |||
| − | |||
| − | |||
| − | |||
| − | |||
| − | Description: | ||
| − | Usage: ~~ | ||
| − | + | Command: <code>~~author</code> | |
| − | + | Description: Inserts the character's name. | |
| − | + | Usage: ~~author | |
| − | |||
| − | |||
| − | |||
| − | |||
| − | |||
| − | |||
| − | < | ||
| − | Description: Inserts the | ||
| − | Usage: ~~ | ||
| − | + | Command: <code>~~location</code> | |
| − | + | Description: Inserts the character's location. | |
| − | + | Usage: ~~location | |
| − | |||
| − | |||
| − | |||
| − | |||
| − | |||
| − | |||
| − | < | ||
| − | Description: Inserts the | ||
| − | Usage: ~~ | ||
| − | + | Command: <code>~~date</code> | |
| − | < | + | Description: Inserts the date. |
| − | + | Usage: ~~date | |
| − | |||
| − | |||
| − | |||
| − | |||
| − | |||
| − | |||
| − | |||
| − | Description: Inserts | ||
| − | Usage: ~~ | ||
| − | + | Command: <code>~~datetime</code> | |
| − | + | Description: Inserts the date and time. | |
| − | + | Usage: ~~datetime | |
| − | |||
| − | |||
| − | |||
| − | |||
| − | |||
| − | |||
| − | < | ||
| − | Description: Inserts | ||
| − | Usage: | ||
| − | + | Command: <code>~~dateplace</code> | |
| − | + | Description: Inserts the date and location on two separate lines. | |
| − | + | Usage: ~~dateplace | |
| − | |||
| − | |||
| − | |||
| − | |||
| − | |||
| − | |||
| − | < | ||
| − | Description: Inserts | ||
| − | Usage: ~~ | ||
| − | + | Command: <code>~~datesig</code> | |
| − | + | Description: Inserts the character's name then the date on two separate lines. | |
| − | + | Usage: ~~datesig | |
| − | |||
| − | |||
| − | |||
| − | |||
| − | |||
| − | < | ||
| − | |||
| − | Description: Inserts | ||
| − | Usage: ~~ | ||
| + | Command: <code><nowiki>~~~~</nowiki></code> | ||
| + | Description: Inserts a horizontal rule of tildes. | ||
| + | Usage: <nowiki>~~~~</nowiki> | ||
| − | < | + | Command: <code>~~--</code> |
| − | + | Description: Inserts a horizontal rule of dashes. | |
| − | + | Usage: ~~-- | |
| − | |||
| − | |||
| − | |||
| − | |||
| − | |||
| − | |||
| − | Description: Inserts | ||
| − | Usage: ~~ | ||
| − | + | Command: <code>~~oo</code> | |
| − | + | Description: Inserts a horizontal rule of the letter "o". | |
| − | + | Usage: ~~oo | |
| − | |||
| − | |||
| − | |||
| − | |||
| − | |||
| − | |||
| − | < | ||
| − | Description: Inserts | ||
| − | Usage: ~~ | ||
| − | + | Command: <code>~~header</code> | |
| − | + | Description: Inserts your text centered amongst two dashed horizontal rules. | |
| − | + | Usage: ~~header Day One of My Journey | |
| − | |||
| − | |||
| − | |||
| − | |||
| − | |||
| − | |||
| − | < | ||
| − | Description: Inserts your text centered amongst two horizontal rules | ||
| − | Usage: ~~ | ||
| − | + | Command: <code>~~headerfancy</code> | |
| − | + | Description: Inserts your text centered amongst two horizontal rules of the letter "o". | |
| − | + | Usage: ~~headerfancy Recipe for Hempstead Haggis | |
| − | |||
| − | |||
| − | |||
| − | |||
| − | |||
| − | |||
| − | < | ||
| − | Description: | ||
| − | Usage: ~~ | ||
| − | + | Command: <code>~~headerdeco</code> | |
| − | + | Description: Inserts your text centered amongst two horizontal rules formed from tildes. | |
| − | + | Usage: ~~headerdeco Chapter 17 | |
| − | |||
| − | |||
| − | |||
| − | |||
| − | |||
| − | |||
| − | < | ||
| − | Description: | ||
| − | Usage: ~~ | ||
| − | + | Command: <code>~~speak</code> | |
| − | < | + | Description: Reads the description out loud. |
| − | + | Usage: ~~speak | |
| − | |||
| − | |||
| − | |||
| − | |||
| − | |||
| − | |||
| − | |||
| − | |||
| − | |||
| − | |||
| − | Description: | ||
| − | Usage: ~ | ||
| − | |||
| − | |||
| − | |||
| − | |||
| − | + | Command: <code>~~whisper</code> | |
| − | + | Description: Whispers the description out loud. | |
| − | + | Usage: ~~whisper | |
| − | |||
| − | |||
| − | |||
| − | |||
| − | |||
| − | < | ||
| − | |||
| − | |||
| − | Description: | ||
| − | Usage: ~~ | ||
| − | |||
| − | |||
| + | Writing In Other [[Languages]] | ||
| + | To write in a language other than common, you must possess the ear for the language you wish to scribe in. Activate the ear, then activate the quill, dip the quill in the ink you plan to use, and use the quill on the parchment you are writing on. You can then write in that language by bracketing the text with square brackets. | ||
| − | < | + | Command: <code>~[text]</code> |
| − | + | Description: Scribes in a language if done after activating an ear | |
| − | + | Usage: ~[The elven tongue is far superior to the other languages.] | |
| − | |||
| + | Would Display: Anira acelal anelvya ela oilm laytyameem ane anira calalaam cillvyilva. | ||
| − | + | Note: Scribed language texts cannot be wiped out using the undo command. The text that appears on the parchment will disappear but the translation will persist when translated back into common. | |
| + | Command: <code>~~translate</code> | ||
| + | Description: Translates text written in a language using an ear, if the translator possesses the same ear. | ||
| + | Usage: ~~translate | ||
| − | + | Note: This only translates text written using the ~[] command using a proper ear. It will not translate any other kind of text. For example, scribing ~Nicce or ~Iracce for "Hello" will not translate, but scribing ~[Hello] using either ear will translate. | |
Revision as of 15:40, 25 March 2019
Contents
Titling Your Parchment
Adding a Header
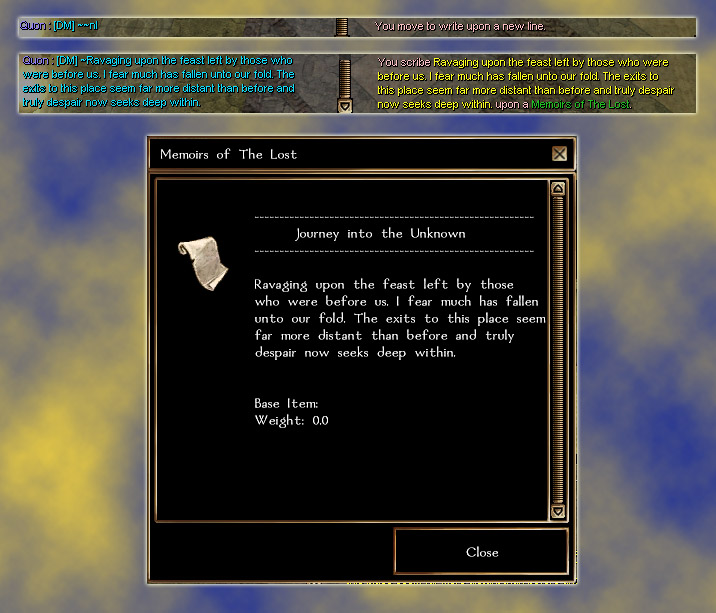
New Line and Some Text
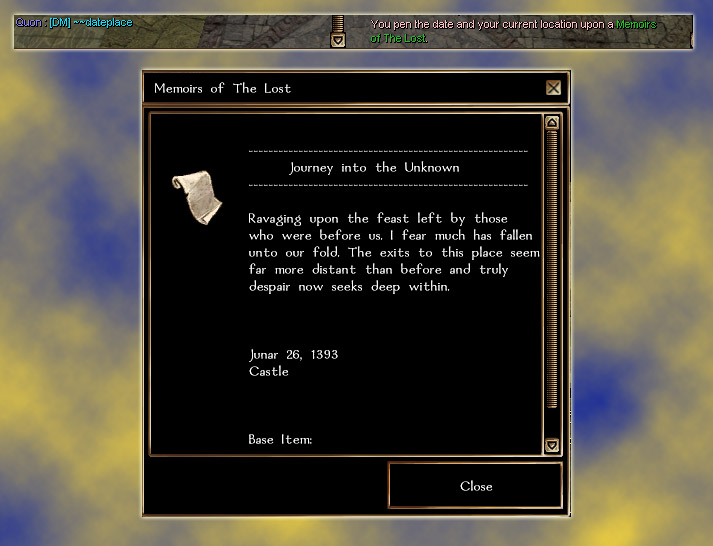
 Quick Command For Date and Location===
Horizontal Rule of The Letter "o"
Another Header
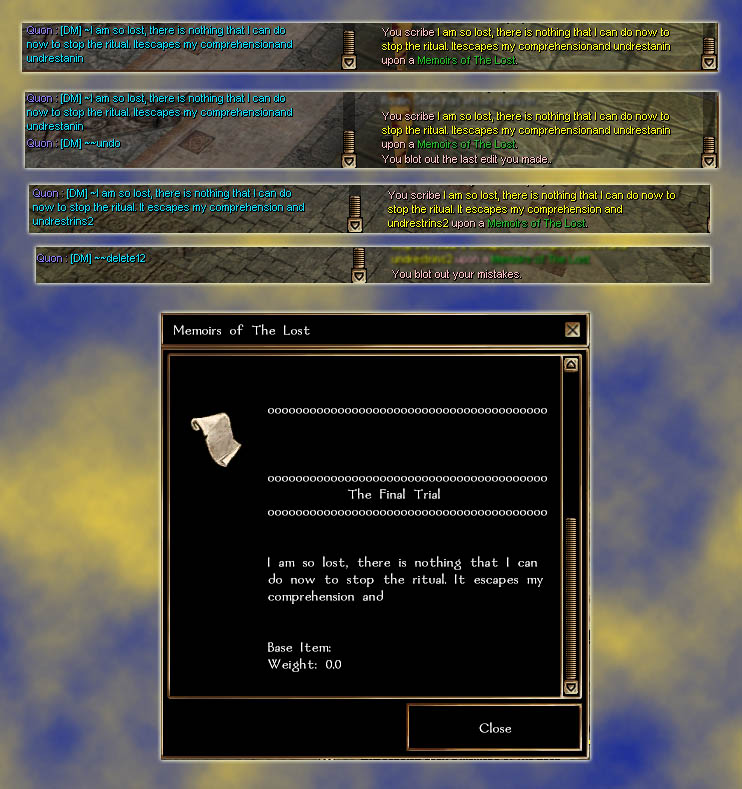
Undo and Delete
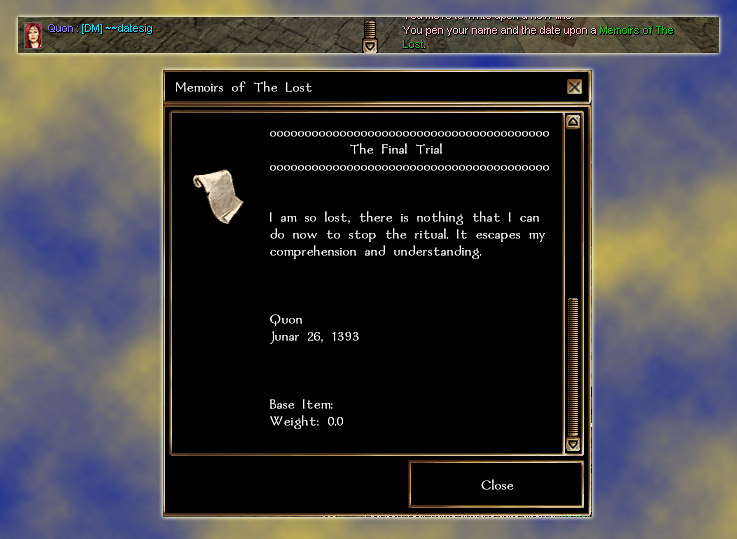
Your Name and Date
The commands I've listed below are also on the Quill's description in game. Notes:
- Use the quill upon the object you will be editing. Syntax for the commands follow.
- Placing edited items on your ox pack will wipe your changes.
- You only need to use the quill once, it works the same as the language ears, requiring a voice.
- You can use the ~ on any channel.
- You can not ever repeat the same command, the system will not "hear" a repeated command.
- Please read the Notes for various commands.
Commands
Command: ~~title
Description: Changes the object's name.
Usage: ~~title Plenarius' Diary
Command: ~
Description: Write upon the object's description.
Usage: ~So I was walking down the street the other day when a dragon fell from the sky.
Note: If you want a space before your word, then put one between the ~ and the first letter (i.e. ~ A new sentence)
Command: ~!
Description: Begins a new paragraph with the text following.
Usage: ~!The next morning dawned and things seemed a little better.
Note: Essentially inserts two new lines and five spaces before your text.
Command: ~~nl
Description: Creates a new line.
Usage: ~~nl or ~~nll or ~~nlll or ~~nllll or ~~nlllll
Note: The amount of the letter "l" indicates how many new lines to insert, from one to five.
Command: ~~tab
Description: Inserts some spaces.
Usage: ~~tab
Command: ~~deleteNNN
Description: Deletes the last NNN characters.
Usage: ~~delete63
Note: If the amount of characters you try to delete exceeds the size of the text, you will erase it all.
Command: ~~erase
Description: Wipes the object's description completely.
Usage: ~~erase
Command: ~~undo
Description: Restores your text to the previous state before your last command.
Usage: ~~undo
Note: This only works once! There is no history, you can not keep undoing.
Command: ~~author
Description: Inserts the character's name.
Usage: ~~author
Command: ~~location
Description: Inserts the character's location.
Usage: ~~location
Command: ~~date
Description: Inserts the date.
Usage: ~~date
Command: ~~datetime
Description: Inserts the date and time.
Usage: ~~datetime
Command: ~~dateplace
Description: Inserts the date and location on two separate lines.
Usage: ~~dateplace
Command: ~~datesig
Description: Inserts the character's name then the date on two separate lines.
Usage: ~~datesig
Command: ~~~~
Description: Inserts a horizontal rule of tildes.
Usage: ~~~~
Command: ~~--
Description: Inserts a horizontal rule of dashes.
Usage: ~~--
Command: ~~oo
Description: Inserts a horizontal rule of the letter "o".
Usage: ~~oo
Command: ~~header
Description: Inserts your text centered amongst two dashed horizontal rules.
Usage: ~~header Day One of My Journey
Command: ~~headerfancy
Description: Inserts your text centered amongst two horizontal rules of the letter "o".
Usage: ~~headerfancy Recipe for Hempstead Haggis
Command: ~~headerdeco
Description: Inserts your text centered amongst two horizontal rules formed from tildes.
Usage: ~~headerdeco Chapter 17
Command: ~~speak
Description: Reads the description out loud.
Usage: ~~speak
Command: ~~whisper
Description: Whispers the description out loud.
Usage: ~~whisper
Writing In Other Languages
To write in a language other than common, you must possess the ear for the language you wish to scribe in. Activate the ear, then activate the quill, dip the quill in the ink you plan to use, and use the quill on the parchment you are writing on. You can then write in that language by bracketing the text with square brackets.
Command: ~[text]
Description: Scribes in a language if done after activating an ear
Usage: ~[The elven tongue is far superior to the other languages.]
Would Display: Anira acelal anelvya ela oilm laytyameem ane anira calalaam cillvyilva.
Note: Scribed language texts cannot be wiped out using the undo command. The text that appears on the parchment will disappear but the translation will persist when translated back into common.
Command: ~~translate
Description: Translates text written in a language using an ear, if the translator possesses the same ear.
Usage: ~~translate
Note: This only translates text written using the ~[] command using a proper ear. It will not translate any other kind of text. For example, scribing ~Nicce or ~Iracce for "Hello" will not translate, but scribing ~[Hello] using either ear will translate.
